


Following on from my introduction to building a modern farm house, this is a more in-depth look at the practical steps to building an energy efficient house from scratch
In this post I cover the three biggest ticket items on our self build at Modern Barn Farm: timber frame, foundations and lastly windows. These three items accounted for around 50% of our overall build cost.
Timber frame
We knew fairly early on we wanted to go for a timber frame construction, due to a number of reasons. Firstly from a cost perspective, we found that timber frame was very competitive when compared to other construction methods. We also wanted to create an energy efficient modern farm house and in terms of airtightness, modern timber frame builds perform very highly.
We got in touch with several local timber frame suppliers and some further afield. We looked at SIPS (structural insulated panels) and a combination of open (no insulation installed) and closed panel (pre installed insulation) timber frame systems.
We sent off our approved plans to each supplier and asked them to quote on a supply only and supply and install basis. As a self build, the beauty of supply and install packages are that suppliers are able to zero rate the price, saving 20% VAT – massively helping with cashflow.
If you’re planning on installing the frame yourself – you can still claim back the VAT element once the house is signed off by building control at the end of the build.
The quotes we received varied a lot in cost from between fifty thousand to over one hundred thousand. Initially we were keen on using SIPS due to the simplicity of their design, but we found the cost significantly higher than a like for like timber frame closed panel system, offering the same U value of 0.17 (which is calculated by the build up of the materials used in wall construction including insulation).
We narrowed our choice down to two timber frame companies, one local and one based in Hull. We spent a lot of time talking to both suppliers to try to understand as much about the design and build process as possible and how it integrates with our foundation system, windows supplier and services (ventilation system, plumbing, electricity – which I’ll cover in another post).
In the end we decided to go with the guys in Hull (Turner Timber) based on a combination of price, overall package and friendly customer service. Before signing on the dotted line we got the train up to Hull to meet the team in person and see their factory. This was really helpful and I’d definitely recommend visiting all your main sub contractors / suppliers if you can. Or if that’s not possible then ask if it’s possible to visit or talk to some of their customers.
Our visit allayed any fears of working with a business based far away. When you are spending large sums of money and have a build schedule to keep to, you want peace of mind that your supplier is going to deliver your house, on budget and on time.
We opted for a supply and install package with a series of payments due on completion of the different phases. The first phase was the bespoke design and all the technical and structural calculations for the frame for sign off by ourselves, before going into manufacture.
All the panels were manufactured in their factory to our design. The external wall panels comprised of treated CLS wood, 120mm of celotex panels, OSB board and wrapped in a waterproof breathable membrane. For the first floor and roof joists they used Easi Joists – a clever system using metal webbing and timber which allows for easy installation of services between different rooms.


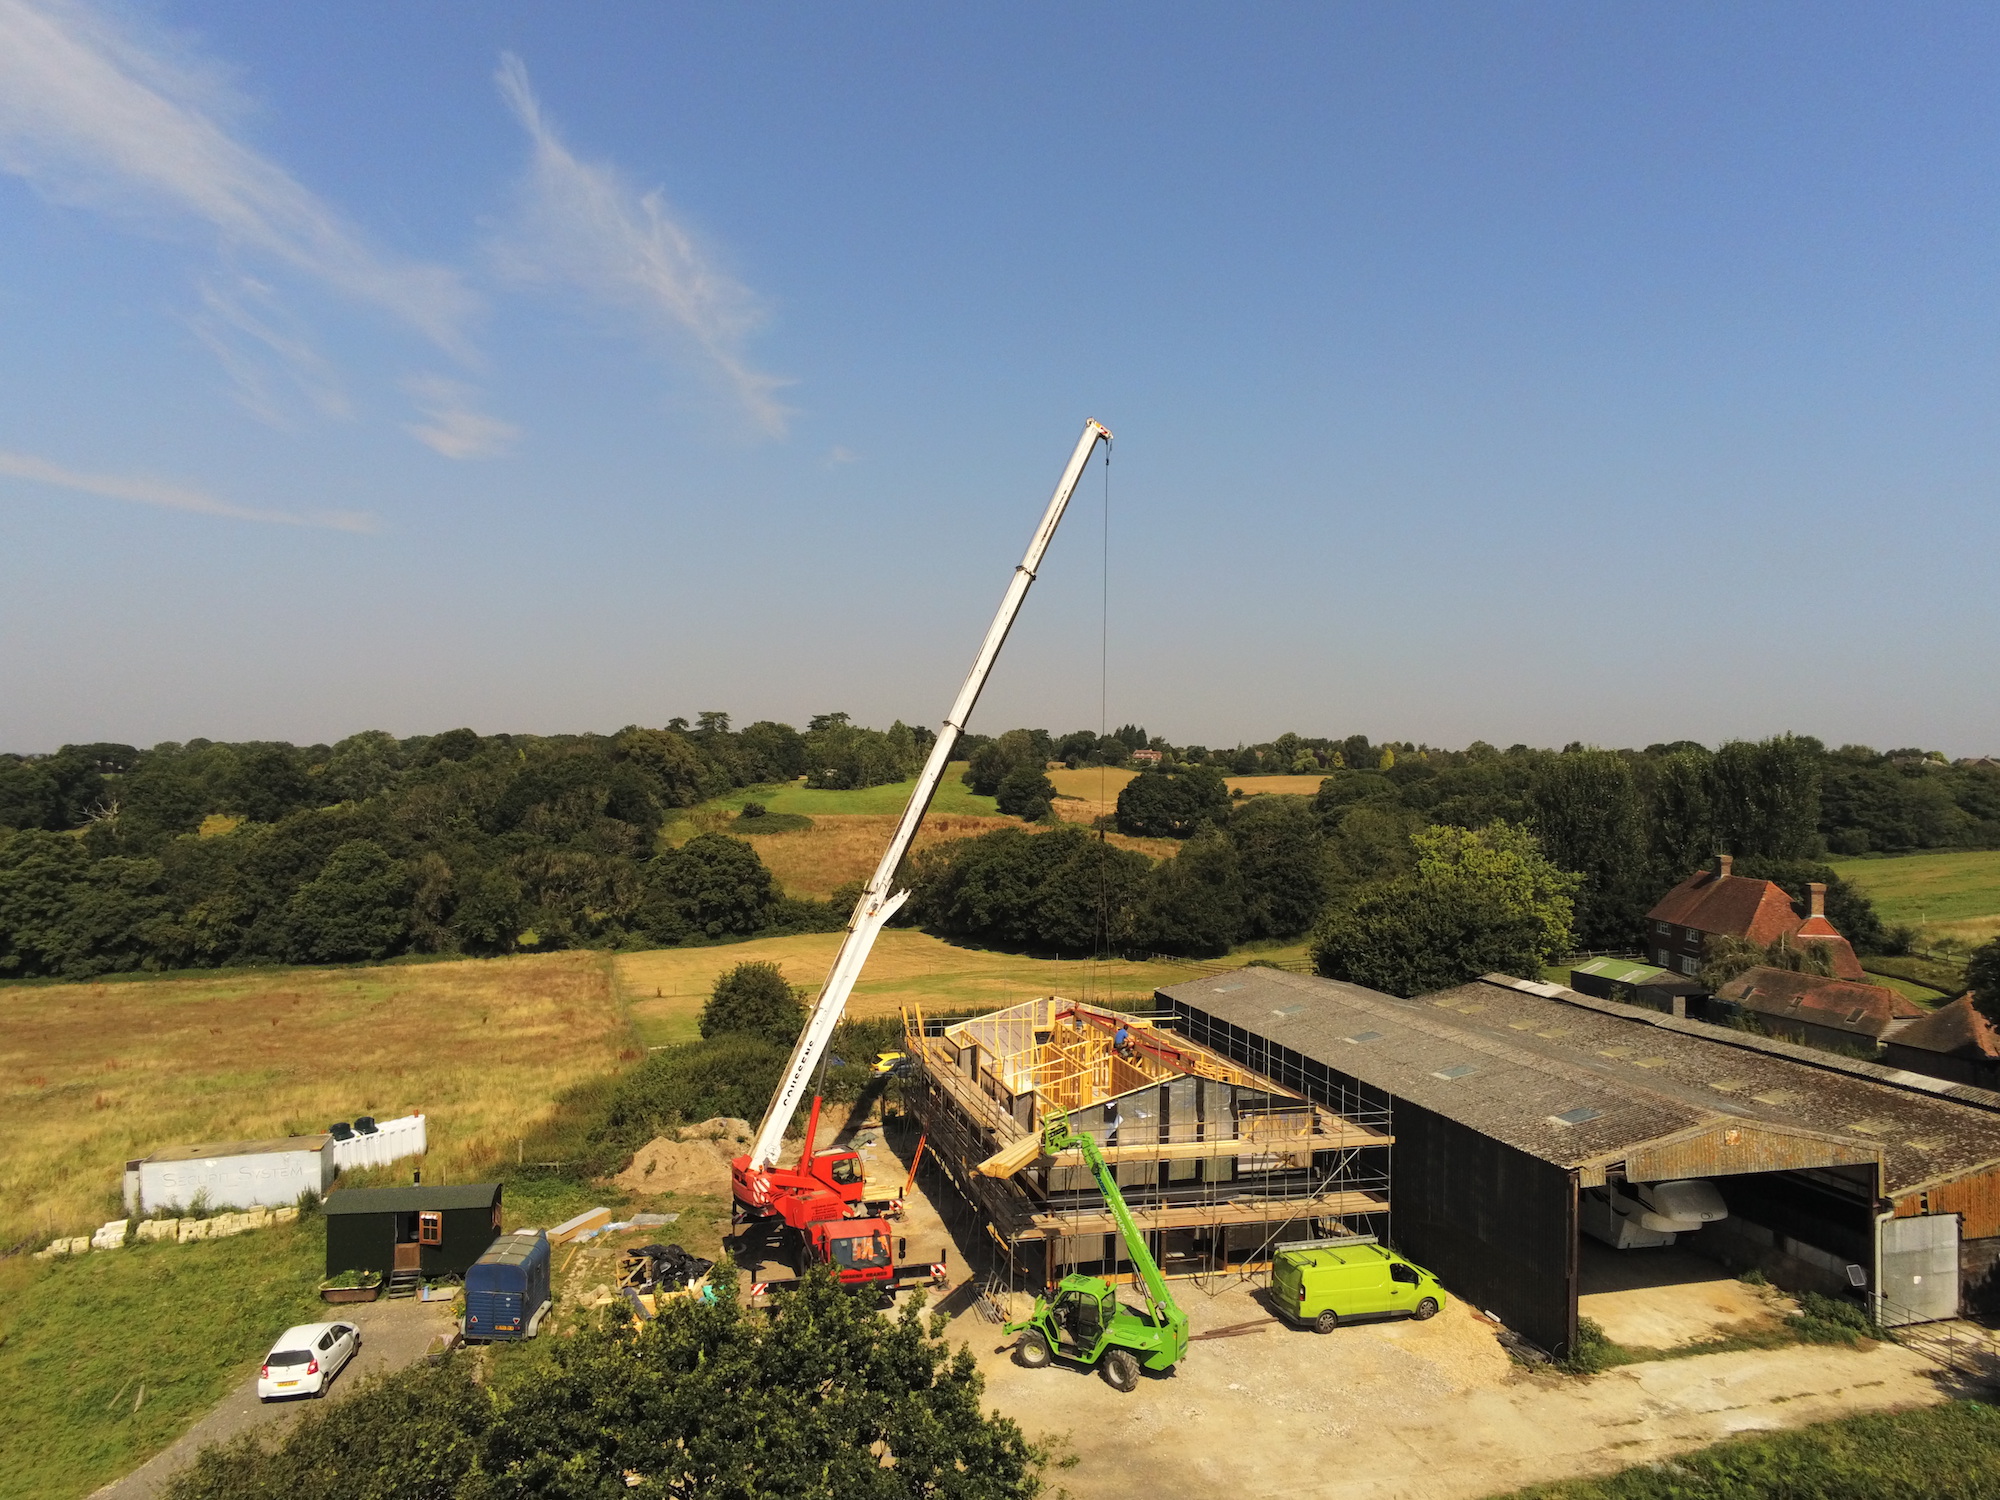
Once all the timber wall panels, joists, first floor flooring, roof sheathing and steel beams were ready, everything was loaded onto their lorries and driven 250 mile to our farm in East Sussex.
Once they arrived onsite their install team (who had travelled down from Doncaster) offloaded everything with a construction tele-handler that I had hired for two weeks – the amount of time needed to install the frame.
We also had to hire a crane and operator for two days to lift the large steels beams into place, and get scaffolding built around the house footprint to aid the install.
Ground works and foundation system
We did a lot of research into the different foundation systems available and found it quite challenging to find businesses who would provide a package to carry out the ground works and foundation system at a reasonable cost.
We had quotes ranging from thirty to over fifty thousand. We liked the idea of a ‘passive slab / passive raft’ system, where the concrete foundations are poured into a tub of insulation that insulates it entirely and prevents it from direct contact with the ground. This system is widely used in Scandinavian countries and is becoming more popular in the UK.


Often, it comes down to ground conditions and local expertise. All the local builders we spoke to seemed unfamiliar with passive rafts and recommended we go with the traditional route of strip foundations.
Strip foundations are one of the most commonly used in the UK, where deep trenches or strips are dug in the ground and filled with concrete – generally at least 1 metre deep. The walls are then built on top of a ground floor slab, often using a beam and block system.
When we costed it up there was very little difference between the two systems and going for a passive raft offered us a better U value (0.10)
Thankfully soil analysis showed we had good ground conditions, so we were able to go with our preferred passive raft solution.
After gathering several quotes we decided to go with a company called Advanced Foundation Technology (AFT) based in Derbyshire, who came in with a very competitive price. The owner and engineer Olof provided us with two options, a design and supply quote and another to design, supply and install.
With very little expertise locally we opted to go for the design, supply and install package. We also opted to go with underfloor heating pipes and manifold installation. Once Turner Timber had finished their technical drawings and structural calculations for the house we sent them over to Olof at AFT. He then produced his structural drawings for our foundation design.
We then worked with a local ground worker to measure out and dig the pit where the passive slab would go. We then lined the pit with 150mm of crushed concrete, which was compacted. At the same time we laid the sewage pipes into the base surrounded with pea shingle. The final stage was adding a layer of 50mm of pea shingle across the whole area.
Blocks of EPS insulation were sent to the site, along with steel mesh and rebar and underfloor heating pipes and the manifold. Olof arrived on site and set about installing the insulation, rebar and underfloor pipes ready for the concrete poured slab. The whole process took around 3 days from his arrival onsite – we were really impressed.
Windows
We looked at a range of different windows suppliers and initially loved all the architectural windows we saw. However we soon discovered, that super thin frames meant sky high prices. In some cases reaching over six figures for all the glazing in our house, not counting the roof lights.
So we were forced to investigate their more chunkier and competitive counterparts. The good news was that the U values were better and we managed to find some suppliers of modern looking chunky windows.
In a bid to keep the house warm in winter and cool in the summer we went with a mix of double and triple glazing units that we think works well. In total we gathered in over ten quotes from different suppliers with quotes ranging from 30k for the budget end of the market with aluminium thermally broken frames to over six figures for the super thin architectural frames. We ended up going with a company called Norrsken, based in Poole, who supply and install high performance triple glazed timber windows and doors with a powder coated aluminium exterior cladding.
We were a quite torn on whether to go with black frames internally but decided to go with Norrsken’s recommendation on keeping them neutral and white. Once they were installed, we were pleased we took their advice, as it keeps the rooms feeling very light inside.


One aspect that required a bit of clever design and technical discussion between the foundation engineer, the timber frame guys and Norrsken was how to create a zero threshold for the lift and slide doors with the concrete floor (so there is no step up). Our foundation engineer created a 50mm recessed threshold to accommodate the base rail of the door using foam fillers (which were later removed).
Once the timber frame was installed we took them up on their measurement survey, which we felt was a small price to pay for the peace of mind that the windows would fit. The downside was we faced a lead time of nearly 12 weeks from sign off to installation date, which did mean a fair amount of rain got in through the window openings from September through to the middle of October. Installation took 3 days and we were really impressed with team.
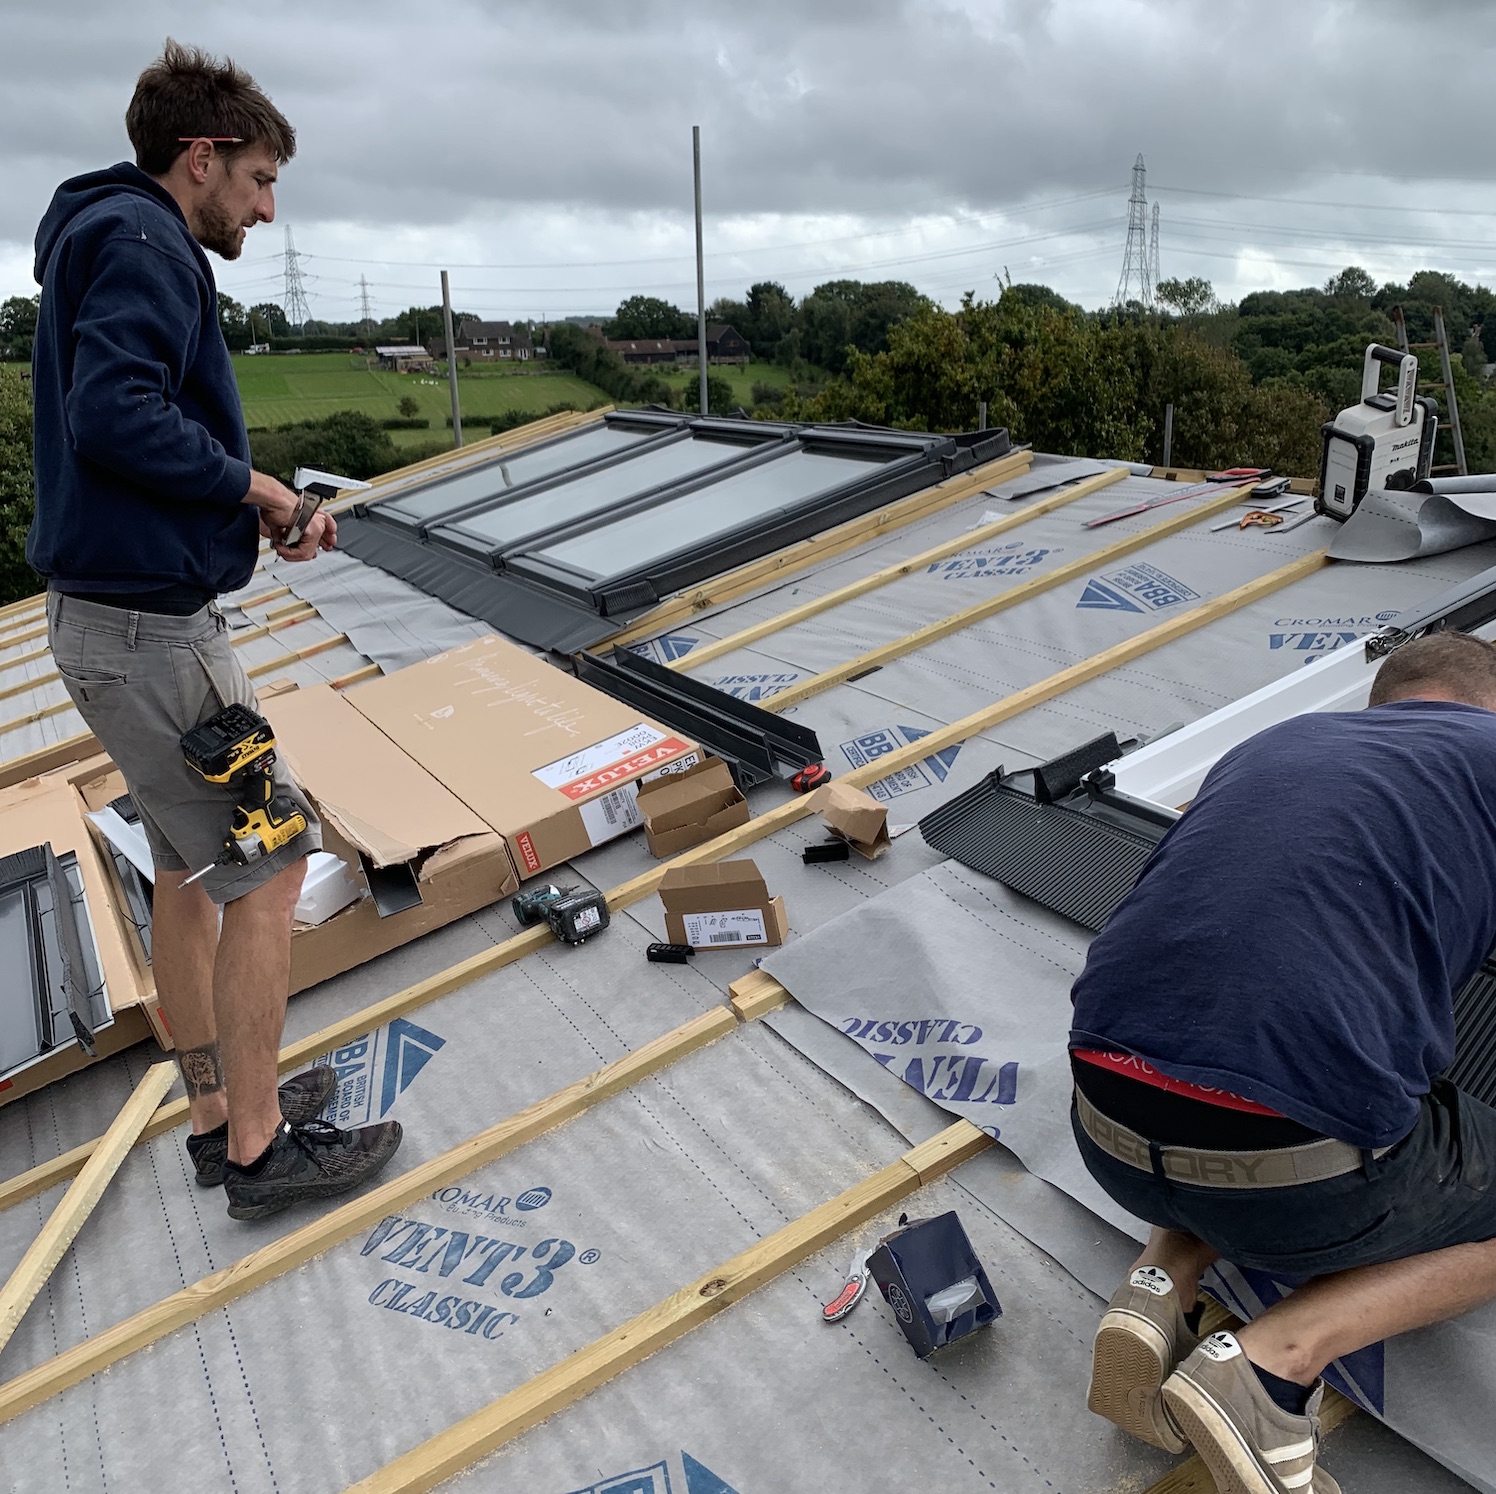
For the roof lights we got a wide spectrum of prices ranging from tens of thousands of pounds for bespoke products to a less than five thousand pounds for seven off the peg solar powered Velux roof lights. In the end it was an easy decision to go for the Velux roof lights, buying them through a Scottish supplier Yard Direct, who were very helpful. They were easy to install and work brilliantly. They even shut themselves when it starts raining.
More Information
Read my introduction post How to build a Modern Farm House here
You can also follow our adventures via our Modern Barn Farm instagram here